The calibration procedure is very simple and can be done at any time.
The basic principle consists in setting two points – lower and upper. For example, to calibrate the input voltage, it is enough to set two voltages. The low point is about 6 volts and the high point is about 30 or 40 volts.
To calibrate, you need a multimeter that can measure voltage and current. Voltage up to 30 or 50 volts, current up to 5 or 20 amperes, depending on the DPS model. Do not use a load during calibration. The load is your multimeter.
Hope your multimeter is good enogh to work as a reference voltmeter and ampermeter.
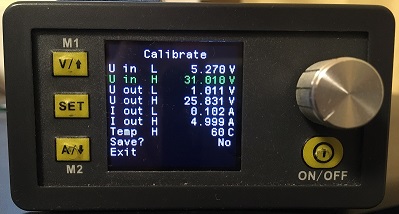
To enter calibration mode :
When the power output is on push “SET” button for 3 seconds.

Before connecting the multimeter, set the appropriate measurement range. To avoid damage of the multimeter by high current or voltage, connect the multimeter only when the selected item is flashing, and disconnect it immediately after fixing the new value.
Navigate through the menu items by “Arrow Up” and “Arrow Down” buttons. The active menu item turns green.
To enter a calibration value rotate the encoder. To move the cursor click “SET” button.
After entering a new correct value, you must press the encoder knob for 3 seconds to fix the value. At this moment, the new calibration value and the current values of the ADC and DAC of the controller are fixed. The fixed value turns blue.
Input Voltage calibration
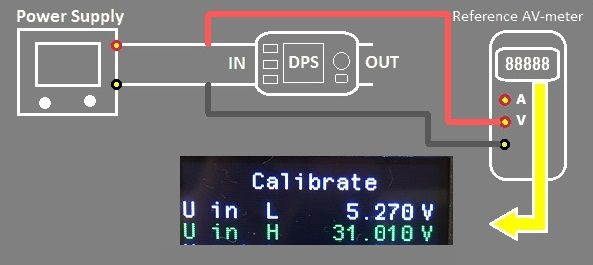
First, apply a low input voltage to the input of the power supply – about 6 volts.
Navigate to the menu item “U in L” which means “U input Low” and click “SET” button. The calibration value will start flash. Set the range of the voltmeter to 20 volts. Connect the voltmeter to the input terminals of your DPS. Enter the value in volts that the voltmeter shows and fix it pushing the knob for 3 seconds. Unplug the voltmeter.
Next go to the menu item “U in H” witch means “U input High”. Set the range of the voltmeter to 200 volts. Then apply a high input voltage to the input of the power supply – about 30 or 40 or 50 volts. Click “SET” button. The calibration value will start flash. Connect the voltmeter to the input terminals of your DPS. Enter the value in volts that the voltmeter shows and fix it pushing the knob for 3 seconds. Unplug the voltmeter.
Output voltage calibration
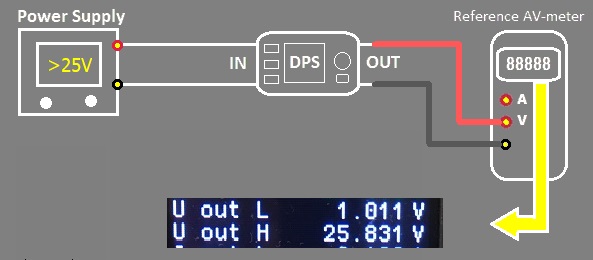
Go to the menu item “U out L”. Click “SET” button. The calibration value will start flash. Set the range of the voltmeter to 2 volts. Connect the voltmeter to the output terminals of your DPS. Enter the value in volts that the voltmeter shows and fix it pushing the knob for 3 seconds. Unplug the voltmeter.
Next go to the menu item “U out H”. Click “SET” button. The calibration value will start flash. Set the range of the voltmeter to 200 volts. Connect the voltmeter to the output terminals of your DPS. Enter the value in volts that the voltmeter shows. Now press and hold the encoder knob for 3 seconds to fix the value. The entered value will turn blue. Then, if necessary, the non-linearity compensation process will automatically start, during which you will see the inscription “WAIT”. This may take a few seconds. Unplug the voltmeter.
Output current calibration
To calibrate the output current you need an ampermeter.
Set correct range of the current depending on your DPS model.
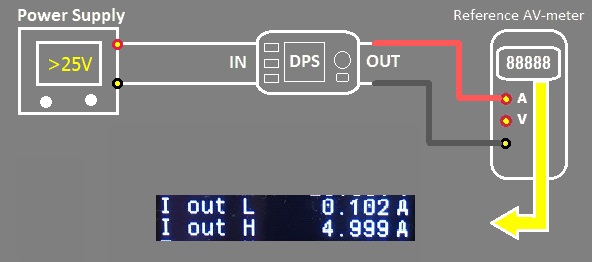
First set the range of the ampermeter to 2 amps. Go to the menu item “I out L”. Click “SET” button. The calibration value will start flash. Connect the ampermeter to the DPS output. Enter the value that the ampermeter shows and fix it pushing the knob for 3 seconds. Unplug the ampermeter.
Next set the range of the ampermeter to 5 or 10 or 20 amps. Go to the menu item “I out H”. Click “SET” button. The calibration value will start flash. Connect the ampermeter to the DPS output. Enter the value that the ampermeter shows and fix it pushing the knob for 3 seconds. Unplug the ampermeter.
Warning: At the time of fixing, the ammeter must be connected !!!
End of calibration
To complete the calibration and save your changes, go to the “Save?” menu item and select “Yes”. Then go to the “Exit” menu item.
If you select “Save? No” and “Exit”, the previous values will be restored. In addition, you can exit the calibration menu without saving by pressing the “ON/OFF” button.
After changing the firmware, it is necessary to do a full calibration of all parameters.
Later, you can refine the parameters individually by selecting only one or a few menu items.
Newly entered values will only take effect after selecting “Save? Yes” and “Exit”. This means that to increase the accuracy of the calibration, the whole procedure must be repeated 2 or 3 times.
Example for I out:
- First pass. Set correct value for “I out L”, push knob 3 sec, the value turns blue. Set correct value for “I out H”, push knob 3 sec, the value turns blue. Next “Save? Yes” and “Exit”.
- Second pass to refine. Set correct value for “I out L”, push knob 3 sec, the value turns blue. Set correct value for “I out H”, push knob 3 sec, the value turns blue. Next “Save? Yes” and “Exit”.
- Third pass to refine if you wish. The same as first and second pass.
If something goes wrong you always can restore default calibration values using “Restore default configuration” menu.
If durring calibration there is no output voltage at all, look here:
NOTE: The entered High value always should be more then Low value. Otherwise calibration will fault.
You can calibrate via USB or Bluetooth using DPSmaster application.
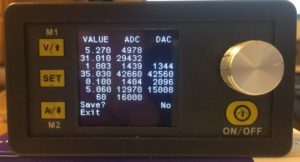
VALUE-ADC-DAC page
If you entered the “Calibrate” screen and turn the knob immediately without selecting any items the “VALUE-ADC-DAC” page will open.
Leave this page by turning the encoder knob again.
Or press the “ON/OFF” button to leave this page without saving.
This page is mainly for information. Do not manually change the values on this page unnecessarily.